Friday, April 17, 2009
Axles Axles Axles
Well in the post "the Answer to the Big Question" I told you that I was going to keep the front axle and swap out the rear axle, and I am going to do a SOA conversion to clear 35" tires. Well some things have changed. First off I am still doing the SOA and swapping the rear axle. Although, when I got under the CJunk5 to look at the front axle to see what I can do to make it stronger I noticed that it is not the axle I thought it was. I thought it was a Dana 30, which is known for being weak, but it is actually a dana 27 which is far more weak than the Dana 30. So I had to change my plans, which isn't a big deal. Once I noticed it I kept an eye out on craigslist.com for a replacement front axle that might match my rear Dana 44 that came out of a Scout II. With some patience I found one. I found a Dana 44 front axle out of a narrow track Jeep Wagoneer. It is a little wider than the rear 44 I have but I got it for $85, and it is not enough to worry about. The waggy front 44 is 60.5" wide and the Scout rear 44 is 58.5" wide. That equals 1" on either side when they are mounted. So I will just deal with that since I got the set of Dana 44's for $160. Oh, and I am going to post some pictures of the new couple soon.
Wiring mess update
Well, I am finally finished with the wiring mess, and it was easily what most people would call hell. I never did get the blinkers working but I figured it doesn't have a top and if there is a cop close I can just use hand signals (yea I know stop laughing). I do however think the the switch is broken and I don't think it is worth spending $300 on a new steering column. I may look funny but it is much cheaper. I also got the interior wiring looking good, or at least got it to where you can't see it. I also installed a radio, finished the winch, and cleaned up the wiring under the hood. I am not completely finished with all of all of this, but it is a work in progress.
Here is a picture of the stereo and please notice there is no longer a huge bundle of colorful wires hinging down from under the dash.

Here is a pic of the new bling that I got. It isn't really applicable to this post but I still want to add it.

Here is a picture of the stereo and please notice there is no longer a huge bundle of colorful wires hinging down from under the dash.

Here is a pic of the new bling that I got. It isn't really applicable to this post but I still want to add it.

Cool Addition on the Cheap
A while back in the post "Wiring project updated" I told you about a new addition to the CJunk5 that I found on the cheap and here it is: I found LED flush-mount tail lights for $30. Yea that is right, I didn't make a mistake, 30 bucks is what I paid. Let me say it again, they are AAAAAWEEESOOOOOOOOME. I put them in and they are bright, and the best part is that I don't have a huge bulbous light hanging off the back that is easily crushed and knocked of by rocks and trees. Here are a few pictures of my super awesome and cheap find.


The Big Idea
I have had this idea for a long time to start a fourwheeling club. Well last week I realized now I have a Jeep again and there is nothing stopping me from starting one. So, I thought I would just get started on it. I put an ad on craigslist.com advertising an offroad event (when I put the add up it was just me and a friend that were concrete on it). The ad got an amaizing response and the event that I am holding might be bigger than I ever thought it could be, which is freakin awesome.
I have lived in T-town now for almost 6 years and in that time I have realized that there is a large amount of wheeling enthusiasts. The unfortunate part is they are very unorganized, and there are very few clubs in our state at all. So, I have made it my goal to get these people organized and unified to further the interest of wheeling, and the only way I can think of to achieve this is to start a club. So, hopefully come May 2nd we will see the birth of a new offroad organization.
I have lived in T-town now for almost 6 years and in that time I have realized that there is a large amount of wheeling enthusiasts. The unfortunate part is they are very unorganized, and there are very few clubs in our state at all. So, I have made it my goal to get these people organized and unified to further the interest of wheeling, and the only way I can think of to achieve this is to start a club. So, hopefully come May 2nd we will see the birth of a new offroad organization.
All that I love
I think the title of this post says it all for me.
Here is a picture of my son Grayson sitting in the driver seat of the CJunk5. He is a natural already.

Here is a picture of my wife and son standing next to the CJunk5.

Here is a picture of my son Grayson sitting in the driver seat of the CJunk5. He is a natural already.

Here is a picture of my wife and son standing next to the CJunk5.

Friday, April 3, 2009
Wiring project updated
Well I have started on the wiring project, and it is far crazier than I thought it could ever be. In a recent issue of JP magazine (my favorite) they had an article called Randy's corner they mentioned how to clean up the bulkhead connecting plug that is under the hood. So, after reading this article I started doing it and it was disgusting. There was 50 year old grease and dirt in there that needed to be cleaned out. After opening it up I was amazed that anything still worked at all. I did a little bit of wire chasing after that but still haven't been able to get the blinkers to work on the front. I am starting to think that the switch on the steering column is bad, but I did come up with some good news. I found the plug that was originally for the rear brake lights (Aaaaawesooome), but I just still can't get the back blinkers to work either. I did however find some really cool additions that I will reveal later though, and I found them on the cheap (cheap makes me happy heehee).
I did take a picture of the underhood wiring mess for you and here it is. I can't tell what is what.

Here is a picture of the interior wiring harness. It looks like a bowl of colorful spaghetti.

I did take a picture of the underhood wiring mess for you and here it is. I can't tell what is what.

Here is a picture of the interior wiring harness. It looks like a bowl of colorful spaghetti.

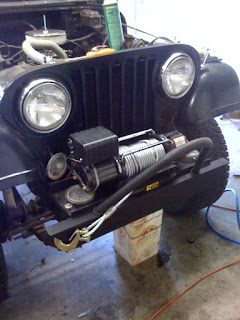
Bumper and Winch
Here are a few pictures of the bumper and winch. Remember I built this bumper from scratch. I think it looks awsome.


The Answer to The BIG QUESTION
Well, I have decided the route that I am going to take with the CJunk5. I am going to do the spring-over-axle conversion. I know it is probably not the best idea, but I really want the added performance and ride quality. Also, I recently found a Dana 44 our of a Scout II that I am going to use to replace the stock model 20 axle. The problem with this axle is that it is 5" wider than the front axle, which I intend to keep dispite it's weak reputation. This would make the rear tires stick out 2.5" further from the body than the front, which might look kind of goofy, so I decided to fix this by putting a wider backspaced wheel on the front axle than on the rear axle. This should make it less noticable, and the wheels won't look funny because I intend to cover them with a beadlock ring. I am going through all of this so that I can not only get the performance and ride quality but also because I really want to run a 35" tire; probably a BFG KM2 but I am not sure yet. I am going to post pictures of the new axle when I get it. Oh, and it only cost my $75 (what a deal).
Friday, March 27, 2009
The BIG question
I am trying to make a decision. Right now the CJunk5 has a 4.5" lift and 33" tires. I really think that with some light triming it could fit 35" tires with ease. I have had the 4" lift and 33" combo before and it works great, but I really want to go bigger and badder with this one. So, I have been thinking about doing a spring-over-axle conversion with 0" lift springs. This gives enough lift to run 36" tires with some trimming. This setup gives more than enough performance offroad but the on-road performance is awful and slightly dangerous. So here is a list of pros and cons for both:
Leaving the lift the same and just trimming to fit 35's.
Pro's:
Cheap
less work (I am lazy)
Better onroad charactoristics
more stable offroad
Con's
Fairly poor performance offroad
Poor ride quality onroad
Spring over conversion
Pro's
Awsome offroad performance
Upgradable
Good ride quality
Con's
Poor onroad performance
more expensive
Making the CJunk5 fat-boy friendly
Well as anyone with any knowledge about Jeeps knows the CJ-5 is the smallest Jeep ever made. It has an extremely short wheel-base leaving a small amount of interior room to work with. They are so short infact that anyone over 200lbs has a problem getting behind the wheel. Being a current fat-boy I had to do something about this, because I would cram my fat ass in the driver seat and the stearing wheel would rub on the old gut while I was driving. I noticed that this was not safe because if I got the hiccup's who knows where the Jeep is going to go. So here was my solution. I actually cut the inner fenders out on the back and placed a support there so I could move the seats back 5.5 inches. Then I welded sheetmetal back in to close it back up. Here are some pictures of the project:
Here is a picture of the left fender. Notice the box that is protruding into the wheel well area. This is the adjustment I made, and it gave me a ton more room to work with.

Here is a picture of the left fender. Notice the box that is protruding into the wheel well area. This is the adjustment I made, and it gave me a ton more room to work with.

Harness install
I am still trying to catch up by blogging what I have already done to the CJunk5. Here are some pics of the 4 point harness' that I installed to keep myself and one other passenger from becoming a projectile in the event of a roll over or crash.
Here is a side view for the of the modification that I made to the roll bar. This is to safely hold the 4 point harness without causing back problems if you do get into a wreck or roll over.

Here you can see really well how I attached the back of the harness to the new portion of the roll bar. Remember all of this was fabricated by me. It all came as a straight pipe or a flat piece of metal, and I made it into this.

Here is a picture of a weld that I made. I am a really awsome welder if you haven't figured that out yet, but to explain I at one time was a profesional code welder. So, don't feel bad if you can't make it look like this, because I had plenty of practice and went to school to learn how to make them look like this.

New Plans for the CJunk5
Well, I have some new plans for the CJunk5. I am naturally going to do some bodywork to it; has to many drain holes in the body for my taste. The intent for this Jeep is to make it cool but different from everyone elses Jeep. So, I have decided to put the front fenders on hinges. This will allow for the front fenders to be swung out to allow for easy access to the engine. I am also planning to cut the fenders during this project to gain more of a flattie Willys styling, which isn't original but there is a reason everyone does it (it is damn cool). If you can't imagine what it is going to look like when the fenders are on hinges don't worry, because I am going to upload in-progress and before and after pictures.
I am also going to tackle the wiring problems that the CJunk5 has. I am going to completely rewire the whole thing, and hopefully add some pretty cool features. I am also going to take away a bunch of crap that is not needed, like interior lights that might or might not work depending on how they are dangling. Yeah the wiring is a mess and it is going to take a while to fix, but intent is to make it as simple as possible to only include lights front and rear, and ignition. I would however allow for enough expansion that I could include a radio and a few little things like that. I am going to add pictures of this also mainly because it is going to be extremely funny.
There is going to be more to come on the plans for the CJunk5.
Wednesday, March 25, 2009
New bumper and winch
I have built a bumper for the CJunk5. I made the bumper out of "C" channel and a scrap piece of pipe along with the winch plate that came with the winch I bought. It actually turned out pretty cool. Here are some pics of the build in progress. I will put some finished pics on later.
Old bumper note that it is bent and looks overall like pooooop:

New bumper in progress:

New bumper being painted:

The winch that will be mounted on it:

Old bumper note that it is bent and looks overall like pooooop:

New bumper in progress:

New bumper being painted:

The winch that will be mounted on it:

Wednesday, March 11, 2009
Pictures of the Blazer that got traded
Here are a few pictures of the Blazer. Can you imagine driving it like this in December for 75 miles?


The Trade
Well, back in early December I traded my 74 Blazer for a Jeep. I am not saying that my Blazer was great, but this Jeep is in ROUGH shape. This is how it all went down: I placed an ad on craigslist to trade the Blazer and this guy contacted me saying he wanted to trade his CJ5 for my Blazer. I drove to the thriving metropolis of Tahlequah, Oklahoma to check it out. It was a piece of crap. But then again my Blazer was no gem either. I deciced to proceed with the trade, which ended up being a complete fiasco. Niether of us wanted to make the journey in these "gems" to actually make the trade, and niether of us had a trailer to haul them. We eventually found a trailer but it was not big enough to haul the Blazer. So I drove it for 75 miles with the top off in December. It was COOOOOOLD!!! It was all completely worth it though, because in the end I had a new piece of crap to work on. My new 1957 Willys CJ5!!!
Subscribe to:
Comments (Atom)